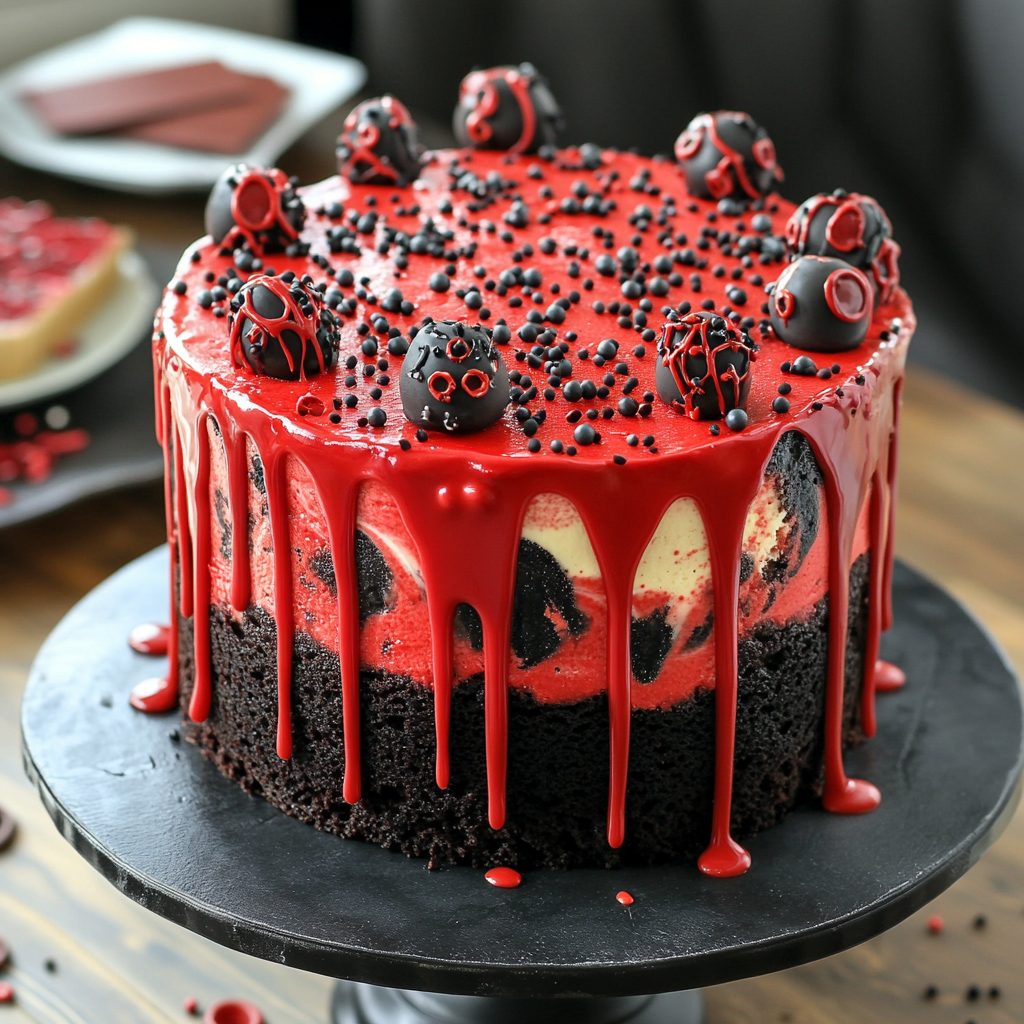
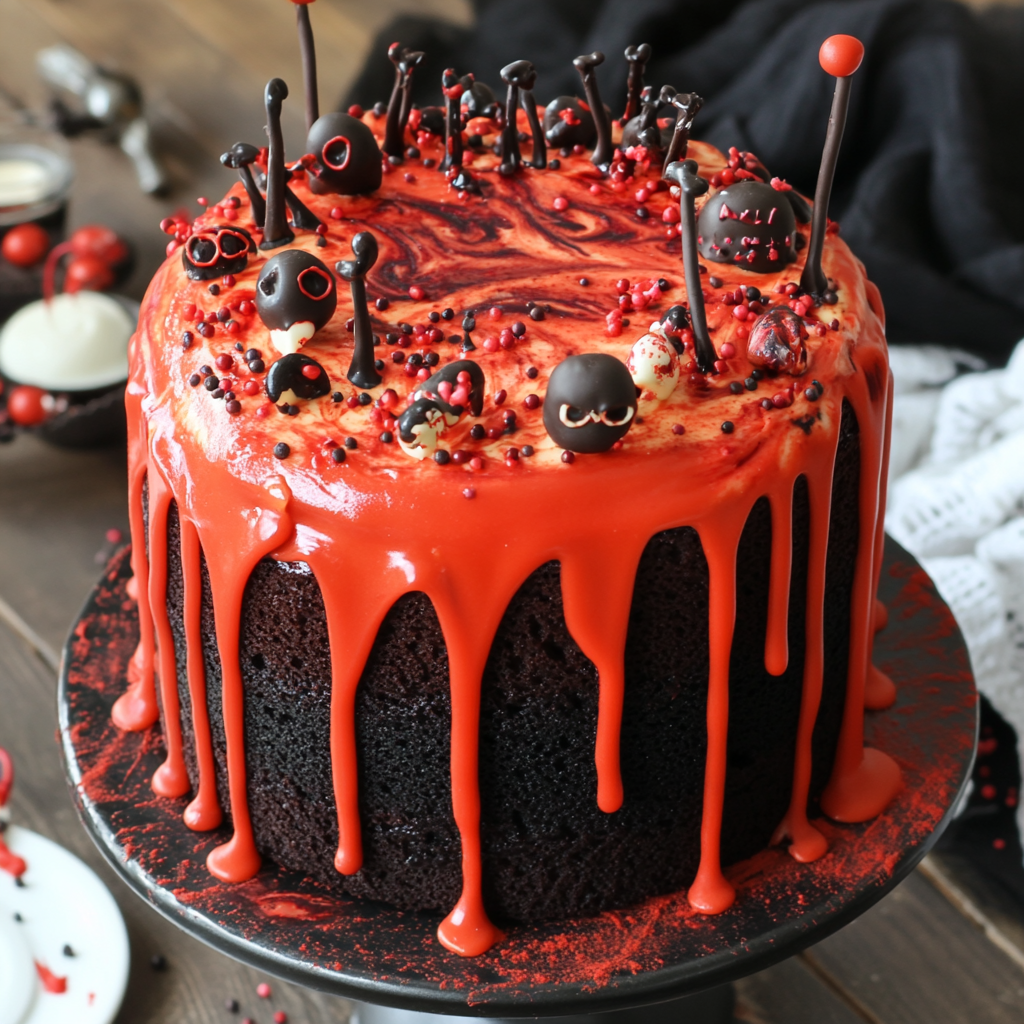
This Spooky Halloween Marble Cake is a showstopper for your Halloween gatherings! With its striking red and black colors, this cake not only looks eerie but also tastes delicious. The unique marbling effect combined with drippy blood icing and gory decorations makes it a perfect centerpiece for spooky celebrations. Whether you’re hosting a Halloween party or looking for a fun treat to share with friends, this cake will surely thrill everyone!

Jump to:
- Why You’ll Love This Recipe
- Tools and Preparation
- Essential Tools and Equipment
- Importance of Each Tool
- Ingredients
- For the Cake
- For the Frosting
- For Decoration
- How to Make Spooky Halloween Marble Cake
- Step 1: Prepare Your Oven and Pans
- Step 2: Mix Dry Ingredients
- Step 3: Cream Butter and Sugar
- Step 4: Combine Wet Ingredients
- Step 5: Incorporate Dry Ingredients
- Step 6: Create Marble Effect
- Step 7: Bake the Cakes
- Step 8: Prepare Frosting
- Step 9: Assemble Cake
- Step 10: Add Decorations
- How to Serve Spooky Halloween Marble Cake
- Festive Plates
- Spooky Cupcake Portions
- Trick-or-Treat Style
- Eyeball Garnish
- Blood Drip Effect
- How to Perfect Spooky Halloween Marble Cake
- Best Side Dishes for Spooky Halloween Marble Cake
- Common Mistakes to Avoid
- Storage & Reheating Instructions
- Refrigerator Storage
- Freezing Spooky Halloween Marble Cake
- Reheating Spooky Halloween Marble Cake
- Frequently Asked Questions
- How do I achieve the best marbling effect in my Spooky Halloween Marble Cake?
- Can I customize my Spooky Halloween Marble Cake?
- What type of frosting works best for this Halloween marble cake?
- Can I make this cake ahead of time?
- What are some fun decoration ideas for my Halloween marble cake?
- Final Thoughts
- 📖 Recipe Card
Why You’ll Love This Recipe
- Eye-catching Presentation: The dramatic red and black marbling makes this cake an impressive dessert that captures the spirit of Halloween.
- Delicious Flavor: Combining rich chocolate with vanilla cake creates a delightful flavor balance that appeals to all taste buds.
- Fun to Decorate: Get creative with the toppings! Add bloody bones and eyeball sprinkles to make it extra spooky and fun.
- Perfect for Any Occasion: While it’s ideal for Halloween, this cake can be adapted for other themed parties or celebrations.
- Easy to Make: The recipe is straightforward, making it accessible even for novice bakers.
Tools and Preparation
To create your Spooky Halloween Marble Cake, you’ll need some essential tools to ensure everything runs smoothly. Gathering the right equipment beforehand will save you time and stress during the baking process.
Essential Tools and Equipment
- 9-inch round cake pans
- Mixing bowls
- Electric mixer
- Rubber spatula
- Measuring cups and spoons
- Cooling rack
Importance of Each Tool
- Electric mixer: Saves time and effort while ensuring your batter is mixed thoroughly.
- 9-inch round cake pans: Perfectly sized to achieve that ideal height and texture in your layers.
- Cooling rack: Helps cakes cool evenly, preventing sogginess on the bottom.
Ingredients
For this Spooky Halloween Marble Cake, gather the following ingredients:
For the Cake
- 2 1/4 cups (293g) all purpose flour
- 2 1/2 tsp baking powder
- 1/4 tsp baking soda
- 1/2 tsp salt
- 1/2 cup (112g) unsalted butter, room temperature
- 1/2 cup vegetable oil
- 1 1/2 cups (310g) sugar
- 1 tbsp vanilla extract
- 4 large eggs
- 1 cup (240ml) buttermilk
- 5 oz bittersweet chocolate (60% cacao), chopped
For the Frosting
- 2 1/4 cups (504g) unsalted butter
- 8 cups (920g) powdered sugar
- 1 cup (114g) natural unsweetened cocoa powder
- 2 tsp vanilla extract
- 5-7 tbsp (75-105ml) water/cream
- 1/4 tsp salt
For Decoration
- Black gel icing color
- Red gel icing color
- 4 oz red Wilton candy melts
- 2 tbsp heavy whipping cream
- Sprinkles (see notes)
Servings: 12, 12-14 slices
Prep Time: 1 hour 45 minutes
Cook Time: 20 minutes
Total Time: 2 hours 5 minutes
Course: Dessert
Cuisine: American
How to Make Spooky Halloween Marble Cake
Step 1: Prepare Your Oven and Pans
Preheat your oven to 350°F (175°C). Grease two 9-inch round cake pans with butter or cooking spray.
Step 2: Mix Dry Ingredients
In a bowl, whisk together:
1. All purpose flour
2. Baking powder
3. Baking soda
4. Salt
Set aside.
Step 3: Cream Butter and Sugar
In a large mixing bowl:
1. Beat together unsalted butter, vegetable oil, and sugar until light and fluffy.
2. Add vanilla extract and eggs one at a time, mixing well after each addition.
Step 4: Combine Wet Ingredients
Mix in buttermilk until fully combined with the wet mixture.
Step 5: Incorporate Dry Ingredients
Gradually add the dry ingredient mixture to the wet ingredients:
1. Mix until just combined; do not overmix.
Step 6: Create Marble Effect
Divide batter into two bowls. In one bowl, melt bittersweet chocolate and mix in black gel icing color until desired shade is reached. Alternate spoonfuls of each batter into prepared pans, then swirl gently with a knife to create a marble effect.
Step 7: Bake the Cakes
Bake in preheated oven for about 20 minutes or until a toothpick inserted comes out clean. Let cool in pans for about 10 minutes before transferring to cooling racks.
Step 8: Prepare Frosting
While cakes cool down, prepare frosting by combining:
1. Unsalted butter,
2. Powdered sugar,
3. Cocoa powder,
4. Vanilla extract,
5. Water or cream,
6. Salt.
Beat until smooth.
Step 9: Assemble Cake
Once cooled completely, place one layer on a serving platter:
1. Spread frosting evenly on top.
2. Place second layer on top.
3. Frost sides and top of the cake.
Step 10: Add Decorations
Melt red candy melts with heavy whipping cream until smooth:
1. Drizzle over the top of the cake for blood effect.
2. Add bloody bones and eyeball sprinkles for decoration.
Enjoy your Spooky Halloween Marble Cake!
How to Serve Spooky Halloween Marble Cake
Serving your Spooky Halloween Marble Cake can be as fun and creative as the cake itself! Here are some delightful serving suggestions that will impress your guests.
Festive Plates
- Use black or orange plates for a spooky touch. This enhances the Halloween theme and makes the red and black marbling stand out.
Spooky Cupcake Portions
- Slice the cake into cupcake-sized portions. This makes it easy for guests to grab a treat while mingling at your Halloween party.
Trick-or-Treat Style
- Serve pieces in small, clear treat bags. Tie them with black ribbon for a fun, grab-and-go option that guests will love.
Eyeball Garnish
- Top each slice with edible eyeball decorations. This adds an eerie but playful element to each serving, making them perfect for Halloween.
Blood Drip Effect
- Drizzle extra red icing on top of each slice. This enhances the blood-like effect and makes every piece look frightfully delicious.
How to Perfect Spooky Halloween Marble Cake
Creating the perfect Spooky Halloween Marble Cake requires attention to detail. Here are some tips to ensure your cake is a hit!
- Use room temperature ingredients: Make sure your butter and eggs are at room temperature for better mixing and texture.
- Don’t overmix: Mix just until combined when adding dry ingredients. Overmixing can lead to a dense cake.
- Check doneness with a toothpick: Insert a toothpick into the center; it should come out clean when the cake is done.
- Cool completely before frosting: Let the cake cool fully before adding icing to prevent it from melting.
- Play with colors: Experiment with different shades of gel icing colors for more dramatic marbling effects.
- Chill before serving: Allow the frosted cake to chill in the fridge for about 30 minutes before serving. This helps set the decorations nicely.
Best Side Dishes for Spooky Halloween Marble Cake
Pairing side dishes with your Spooky Halloween Marble Cake can elevate your dessert table. Here are some great options to consider:
- Witch’s Brew Punch: A spooky, fruity punch that complements the sweet flavors of your cake.
- Ghostly Cheese Platter: Offer assorted cheeses shaped like ghosts or pumpkins; this adds a savory balance to your dessert.
- Pumpkin Soup Shots: Serve warm pumpkin soup in shot glasses for a festive appetizer that pairs well with sweet treats.
- Creepy Veggie Tray: Arrange veggies in the shape of skeletons or monsters paired with dip; this provides a healthy contrast.
- Monster Macarons: These colorful French cookies can be decorated like monsters, making them an eye-catching addition.
- Spider Web Dip: Create a layered dip resembling a spider web, served with tortilla chips for a fun snack option.
Common Mistakes to Avoid
Making a Spooky Halloween Marble Cake can be a fun experience, but it’s easy to encounter some pitfalls. Here are common mistakes and how to avoid them:
- Ignoring ingredient temperature: Using cold butter or eggs can prevent your cake from rising properly. Always ensure your butter is at room temperature and eggs are slightly warmed.
- Overmixing the batter: Mixing too much can lead to a dense cake. Mix just until combined for a lighter texture.
- Not measuring accurately: Using too much or too little of an ingredient can affect your cake’s rise and flavor. Use a kitchen scale for precise measurements.
- Skipping the cooling time: Cutting into the cake too soon can result in a crumbly texture. Allow your cake to cool completely before frosting or serving.
- Neglecting color consistency: If using gel colors, be careful not to add too much at once. Start with small amounts and gradually increase until you achieve the desired shade.
Storage & Reheating Instructions
Refrigerator Storage
- Store the cake in an airtight container.
- It will stay fresh for up to 5 days in the refrigerator.
Freezing Spooky Halloween Marble Cake
- Wrap the cake tightly in plastic wrap.
- It can be frozen for up to 3 months. Thaw in the refrigerator before serving.
Reheating Spooky Halloween Marble Cake
- Oven: Preheat your oven to 350°F (175°C). Place the slice on a baking sheet and cover it with foil. Heat for about 10-15 minutes.
- Microwave: Place a slice on a microwave-safe plate. Heat in short bursts of 10-15 seconds until warm.
- Stovetop: For a quick reheat, place a slice in a non-stick skillet over low heat. Cover with a lid and warm for about 5 minutes.
Frequently Asked Questions
How do I achieve the best marbling effect in my Spooky Halloween Marble Cake?
To get that striking marbled look, alternate spoonfuls of black and red batter into your pan. Use a knife or skewer to gently swirl them together without mixing fully.
Can I customize my Spooky Halloween Marble Cake?
Absolutely! You can change the colors or flavors by using different gel food coloring or adding spices like cinnamon or nutmeg for an autumn twist.
What type of frosting works best for this Halloween marble cake?
A simple buttercream frosting works perfectly, but consider adding cream cheese frosting for an extra tangy flavor that complements the sweetness of the cake.
Can I make this cake ahead of time?
Yes, you can bake and decorate your Spooky Halloween Marble Cake one day in advance; just store it properly in an airtight container at room temperature or refrigerate it if needed.
What are some fun decoration ideas for my Halloween marble cake?
You can use candy eyeballs, gummy worms, or chocolate bones as decorations. Get creative with edible glitter or spooky-themed sprinkles!
Final Thoughts
The Spooky Halloween Marble Cake is not only delicious but also visually captivating, making it perfect for any Halloween gathering. Its versatility allows you to customize flavors and decorations according to your theme. Try this recipe out, and let your creativity run wild!
Did You Enjoy Making This Recipe? Please rate this recipe with ⭐⭐⭐⭐⭐ or leave a comment.
📖 Recipe Card
Print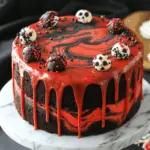
Spooky Halloween Marble Cake
- Total Time: 2 hours 5 minutes
- Yield: Serves approximately 12 people 1x
Description
Indulge in the delightfully eerie Spooky Halloween Marble Cake, a bewitching centerpiece for your Halloween festivities. This visually striking cake features an enchanting marbling of rich chocolate and vanilla, draped in a devilishly delicious buttercream frosting. Topped with a dripping ‘blood’ effect and gory decorations, it’s not just a treat for the eyes but also tantalizes taste buds with its perfect balance of flavors. Whether you’re hosting a haunting gathering or simply want to impress friends, this cake is guaranteed to be the star of the show. Easy to make and fun to decorate, it’s perfect for bakers of all skill levels looking to create a memorable dessert that captures the essence of Halloween.
Ingredients
- 2 1/4 cups all-purpose flour
- 2 1/2 tsp baking powder
- 1/4 tsp baking soda
- 1/2 tsp salt
- 1/2 cup unsalted butter
- 1/2 cup vegetable oil
- 1 1/2 cups sugar
- 1 tbsp vanilla extract
- 4 large eggs
- 1 cup buttermilk
- 5 oz bittersweet chocolate (60% cacao), chopped
- 2 1/4 cups unsalted butter (for frosting)
- 8 cups powdered sugar
- 1 cup natural unsweetened cocoa powder
- 2 tsp vanilla extract (for frosting)
- 5–7 tbsp water/cream (for frosting)
- 1/4 tsp salt (for frosting)
- Black gel icing color
- Red gel icing color
- 4 oz red Wilton candy melts
- 2 tbsp heavy whipping cream
- Sprinkles (for decoration)
Instructions
- Preheat oven to 350°F (175°C). Grease two 9-inch round cake pans.
- Whisk together flour, baking powder, salt, and baking soda; set aside.
- In a mixing bowl, cream together butter, oil, and sugar until fluffy. Add eggs one at a time along with vanilla.
- Mix in buttermilk until combined.
- Gradually add dry ingredients; mix until just combined.
- Divide batter; melt chocolate and mix into half for marbling.
- Spoon alternating batters into pans and swirl gently.
- Bake for about 20 minutes or until a toothpick comes out clean. Let cool before frosting.
- Prepare frosting by beating butter with powdered sugar and cocoa; add water as needed for consistency.
- Frost cooled cake layers and decorate with melted candy melts and spooky toppings.
- Prep Time: 1 hour 45 minutes
- Cook Time: 20 minutes
- Category: Dessert
- Method: Baking
- Cuisine: American
Nutrition
- Serving Size: 1 serving
- Calories: 435
- Sugar: 38g
- Sodium: 183mg
- Fat: 21g
- Saturated Fat: 12g
- Unsaturated Fat: 8g
- Trans Fat: 0g
- Carbohydrates: 55g
- Fiber: 0g
- Protein: 4g
- Cholesterol: 73mg