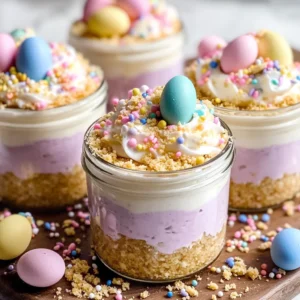
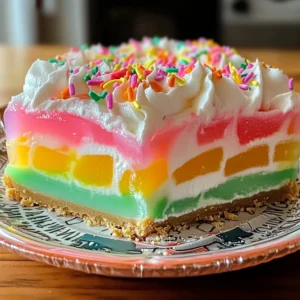
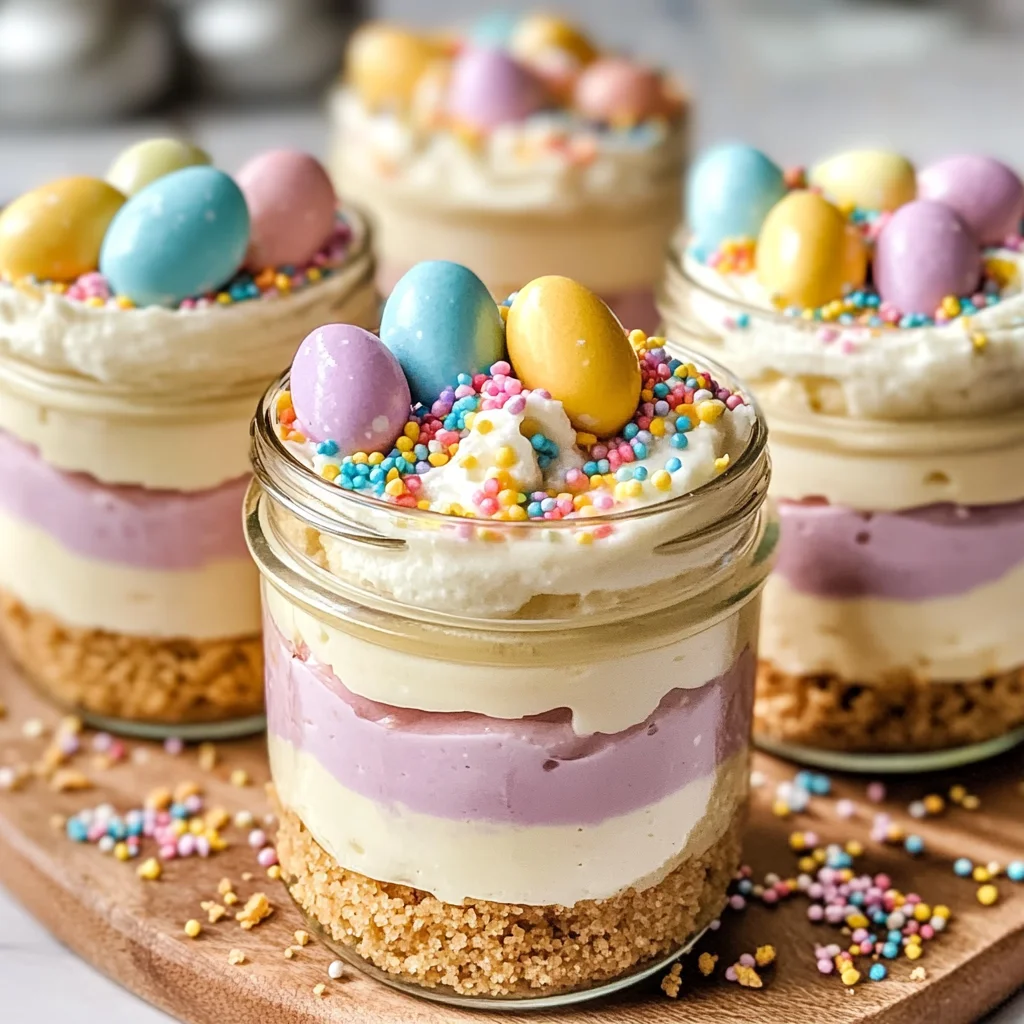
Mini Easter Cheesecake Jars – A Cute, No-Bake Spring Dessert are the perfect treat for your spring celebrations! These delightful little jars combine a creamy cheesecake filling with a crunchy crust, making them an adorable and tasty choice for any occasion. Whether you’re hosting an Easter brunch or simply want something fun for the family, these mini cheesecakes will surely impress.

Jump to:
- Why You’ll Love This Recipe
- Tools and Preparation
- Essential Tools and Equipment
- Importance of Each Tool
- Ingredients
- For the Crust
- For the Cheesecake Filling
- For Color and Flavor (Optional)
- For Toppings
- How to Make Mini Easter Cheesecake Jars – A Cute, No-Bake Spring Dessert
- Step 1: Make the Crumb Base
- Step 2: Pack the Crust
- Step 3: Whip the Cream
- Step 4: Beat the Cream Cheese
- Step 5: Fold It Together
- Step 6: Add Color (Optional)
- Step 7: Fill the Jars
- Step 8: Chill
- Step 9: Decorate
- Step 10: Serve Cold
- How to Serve Mini Easter Cheesecake Jars – A Cute, No-Bake Spring Dessert
- For Easter Brunch
- As Party Favors
- With Seasonal Drinks
- On Dessert Tables
- How to Perfect Mini Easter Cheesecake Jars – A Cute, No-Bake Spring Dessert
- Best Side Dishes for Mini Easter Cheesecake Jars – A Cute, No-Bake Spring Dessert
- Common Mistakes to Avoid
- Storage & Reheating Instructions
- Refrigerator Storage
- Freezing Mini Easter Cheesecake Jars – A Cute, No-Bake Spring Dessert
- Reheating Mini Easter Cheesecake Jars – A Cute, No-Bake Spring Dessert
- Frequently Asked Questions
- What makes Mini Easter Cheesecake Jars – A Cute, No-Bake Spring Dessert special?
- Can I use different flavors in my cheesecake filling?
- How long do I need to chill the mini cheesecakes?
- Are there any alternatives for cream cheese?
- Final Thoughts
- 📖 Recipe Card
Why You’ll Love This Recipe
- No-Bake Convenience: This recipe is easy to prepare without using an oven, making it ideal for busy days.
- Customizable Flavors: You can personalize the taste with different extracts and colors to match your theme.
- Perfect Portions: Individual jars mean everyone gets their own dessert—no sharing required!
- Festive Presentation: The colorful toppings and layers create an eye-catching display suitable for any celebration.
- Kid-Friendly Fun: Kids will love helping decorate their own jars with sprinkles and candies.
Tools and Preparation
To whip up these Mini Easter Cheesecake Jars, you’ll need some essential tools. Having the right equipment makes preparation smoother and more enjoyable.
Essential Tools and Equipment
- Mixing bowls
- Hand mixer
- Piping bag or spoon
- 8–10 small jars (4–6 oz)
Importance of Each Tool
- Mixing bowls: These are crucial for combining ingredients efficiently without spilling.
- Hand mixer: A hand mixer ensures your cream cheese becomes fluffy and smooth quickly, saving you time.
- Piping bag or spoon: These tools help you neatly fill the jars with cheesecake mixture, giving a professional look.
Ingredients
For the Crust
- 1 1/2 cups grachicken chicken ham cracker crumbs (or digestive biscuits)
- 5 tablespoons unsalted butter (melted)
- 2 tablespoons sugar
- Pinch of salt
For the Cheesecake Filling
- 12 oz cream cheese (softened)
- 1/2 cup powdered sugar
- 1 teaspoon vanilla extract
- 1 tablespoon lemon juice
- 1 cup cold heavy whipping cream
For Color and Flavor (Optional)
- A few drops of gel food coloring (pastel shades)
- Lemon zest or almond extract to taste
For Toppings
- Mini chocolate eggs or jelly beans
- Pastel sprinkles
- Shredded coconut (optional, dyed green for “grass”)
How to Make Mini Easter Cheesecake Jars – A Cute, No-Bake Spring Dessert
Step 1: Make the Crumb Base
To start, stir together the grachicken chicken ham crumbs, sugar, salt, and melted butter in a mixing bowl until it resembles wet sand.
Step 2: Pack the Crust
Spoon 2–3 tablespoons of this mixture into each jar. Use the back of a spoon to press down firmly so that it holds together.
Step 3: Whip the Cream
In another cold bowl, whip heavy cream until you reach medium-stiff peaks. Set it aside in the fridge while preparing other components.
Step 4: Beat the Cream Cheese
In a separate bowl, mix softened cream cheese, powdered sugar, vanilla extract, and lemon juice together until smooth and fluffy. This should take about 1–2 minutes.
Step 5: Fold It Together
Gently fold the whipped cream into your cream cheese mixture in two additions until no streaks remain. Be careful not to deflate the whipped cream!
Step 6: Add Color (Optional)
If desired, divide your filling into portions and add a few drops of pastel gel food coloring. Stir until evenly colored for that perfect spring look.
Step 7: Fill the Jars
Using a piping bag or spoon, fill each jar with cheesecake filling over the crust layer. Leave some space at the top for toppings.
Step 8: Chill
Cover each jar and refrigerate them for at least 2 hours to allow them to set properly. You can chill them up to 24 hours if needed.
Step 9: Decorate
Just before serving, add shredded coconut dyed green for grass, sprinkle on pastel decorations, and place mini chocolate eggs or jelly beans on top.
Step 10: Serve Cold
Hand out these charming jars with small spoons. Enjoy every creamy bite with crunchy layers!
How to Serve Mini Easter Cheesecake Jars – A Cute, No-Bake Spring Dessert
Serving Mini Easter Cheesecake Jars is all about creating a delightful presentation that complements the festive spirit of spring. These charming little desserts can be enjoyed at any gathering, making them perfect for Easter celebrations or springtime parties.
For Easter Brunch
- Miniature Place Settings: Arrange each jar on a small plate with a matching napkin for a whimsical touch.
- Personalized Toppers: Add name tags attached to each jar for a special guest experience.
As Party Favors
- Cute Packaging: Wrap jars in clear cellophane and tie them with pastel ribbons for an adorable take-home treat.
- Themed Stickers: Use Easter-themed stickers to decorate the lids, adding to the festive feel.
With Seasonal Drinks
- Refreshing Lemonade: Serve these jars alongside chilled lemonade infused with fresh mint for a refreshing pairing.
- Flavored Iced Tea: Complement the sweetness of the cheesecake with lightly sweetened iced tea, offering guests a variety of flavors.
On Dessert Tables
- Layered Display: Create height by using cake stands or tiered trays, showcasing the jars as the star attraction.
- Color Coordination: Match the colors of your dessert table decor with pastel shades found in the cheesecake filling and toppings.
How to Perfect Mini Easter Cheesecake Jars – A Cute, No-Bake Spring Dessert
Creating perfect Mini Easter Cheesecake Jars requires attention to detail and a few helpful tips. Here are some ideas to elevate your dessert game.
- Bold Cream Cheese Base: Ensure your cream cheese is softened properly for a smooth and creamy filling.
- Bold Whipping Technique: Use a cold bowl when whipping cream; this helps achieve better peaks and texture.
- Bold Flavor Enhancements: Experiment with different extracts like almond or lemon zest for added flavor depth.
- Bold Layering Strategy: When filling jars, pipe layers for even distribution and an aesthetically pleasing look.
- Bold Chilling Time: Allow more time in the fridge if possible; this enhances flavor and helps it set perfectly.
Best Side Dishes for Mini Easter Cheesecake Jars – A Cute, No-Bake Spring Dessert
Pairing side dishes with your Mini Easter Cheesecake Jars can enhance the overall dining experience. Here are some delightful options that work well together.
- Bold Fruit Salad: A colorful medley of seasonal fruits adds freshness and balances sweetness.
- Bold Vegetable Platter: Crunchy veggies served with hummus provide a healthy contrast to the rich cheesecake.
- Bold Spring Rolls: Fresh vegetable spring rolls offer lightness and can be dipped in sweet chili sauce for extra flavor.
- Bold Quiche Bites: Mini quiches filled with spinach or cheese are savory options that complement sweet desserts beautifully.
- Bold Cheese Board: An assortment of cheeses alongside crackers brings variety and pairs well with desserts.
- Bold Mediterranean Couscous Salad: Lightly dressed couscous mixed with vegetables adds a hearty yet refreshing side dish.
Common Mistakes to Avoid
Making Mini Easter Cheesecake Jars can be a delightful experience, but there are a few common mistakes that can affect the outcome.
- Bold choice of ingredients: Using low-fat cream cheese might seem like a healthier option, but it won’t give you the same rich texture. Stick with full-fat cream cheese for the best results.
- Bold crust mishaps: Not packing the crust firmly enough can lead to a crumbly base. Ensure you press down firmly so it holds together when serving.
- Bold mixing errors: Overmixing the cheesecake filling can cause it to become too airy. Mix just until combined for a smooth and creamy texture.
- Bold cooling issues: Skipping the chilling step can result in a runny filling. Be sure to refrigerate for at least 2 hours to allow it to set properly.
- Bold decoration timing: Adding toppings too early can make them soggy. Decorate just before serving to keep everything fresh and crunchy.
Storage & Reheating Instructions
Refrigerator Storage
- Store Mini Easter Cheesecake Jars in an airtight container in the refrigerator.
- They will keep well for up to 5 days.
Freezing Mini Easter Cheesecake Jars – A Cute, No-Bake Spring Dessert
- You can freeze these jars for up to 3 months.
- Make sure they are sealed tightly in freezer-safe containers or bags.
Reheating Mini Easter Cheesecake Jars – A Cute, No-Bake Spring Dessert
- Oven: Not recommended as these desserts are best served cold.
- Microwave: Reheat very gently if needed, but this can alter the texture.
- Stovetop: Not applicable; these jars should be enjoyed cold.
Frequently Asked Questions
Here are some frequently asked questions about Mini Easter Cheesecake Jars.
What makes Mini Easter Cheesecake Jars – A Cute, No-Bake Spring Dessert special?
Mini Easter Cheesecake Jars are perfect for spring celebrations, offering a fun and festive treat that is easy to share and customize with seasonal decorations.
Can I use different flavors in my cheesecake filling?
Absolutely! You can experiment with different extracts like almond or orange zest to create unique flavor profiles tailored to your tastes.
How long do I need to chill the mini cheesecakes?
They should be chilled for at least 2 hours, but you can refrigerate them for up to 24 hours for optimal results.
Are there any alternatives for cream cheese?
Yes! If you’re looking for a dairy-free option, consider using vegan cream cheese or cashew-based spreads as substitutes.
Final Thoughts
Mini Easter Cheesecake Jars are not only adorable but also versatile and easy to make. Their no-bake nature means you can whip them up quickly, while customization options allow you to tailor them for any celebration. Enjoy creating this delightful spring dessert!
Did You Enjoy Making This Recipe? Please rate this recipe with ⭐⭐⭐⭐⭐ or leave a comment.
📖 Recipe Card
Print
Mini Easter Cheesecake Jars – A Cute, No-Bake Spring Dessert
- Total Time: 0 hours
- Yield: Serves approximately 8 jars 1x
Description
Indulge in the charm of Mini Easter Cheesecake Jars, a delightful no-bake dessert that’s perfect for spring celebrations. These adorable jars combine a creamy cheesecake filling with a crunchy, buttery crust, making them an irresistible treat for any occasion. Whether you’re hosting an Easter brunch or looking for a fun family dessert, these mini cheesecakes are sure to impress with their vibrant colors and festive toppings. Plus, they’re easy to customize with your favorite flavors and decorations, making them a hit with kids and adults alike!
Ingredients
- 1 1/2 cups graham cracker crumbs (or digestive biscuits)
- 5 tablespoons unsalted butter (melted)
- 12 oz cream cheese (softened)
- 1/2 cup powdered sugar
- 1 cup cold heavy whipping cream
- 1 teaspoon vanilla extract
- Optional: Gel food coloring, lemon zest, mini chocolate eggs or jelly beans for decoration
Instructions
- In a mixing bowl, combine graham cracker crumbs, melted butter, sugar, and salt until it resembles wet sand.
- Press 2–3 tablespoons of the mixture into each jar to form the crust.
- In a separate bowl, whip the heavy cream until medium-stiff peaks form and refrigerate.
- Beat softened cream cheese with powdered sugar, vanilla extract, and lemon juice until smooth.
- Gently fold in the whipped cream until combined.
- If desired, add gel food coloring or lemon zest to the filling.
- Fill each jar with the cheesecake mixture over the crust layer and refrigerate for at least 2 hours.
- Decorate with toppings just before serving.
- Prep Time: 20 minutes
- Cook Time: None
- Category: Dessert
- Method: No-Bake
- Cuisine: American
Nutrition
- Serving Size: 1 jar (150g)
- Calories: 350
- Sugar: 22g
- Sodium: 180mg
- Fat: 25g
- Saturated Fat: 15g
- Unsaturated Fat: 8g
- Trans Fat: 0g
- Carbohydrates: 30g
- Fiber: 1g
- Protein: 4g
- Cholesterol: 80mg